Home decor is an important aspect of creating a comfortable and personalized living space. While traditional wallpaper can provide a stylish touch, it can also be a hassle to install and remove. Fortunately, removable wallpaper has become increasingly popular in recent years, offering an easy and affordable way to transform any room. In this article, we will provide a step-by-step guide for the simple installation of removable wallpaper, allowing you to elevate your home decor without the stress or commitment of traditional wallpaper. Whether you’re a DIY enthusiast or a novice, this guide will help you achieve a beautiful and seamless finish in no time.
Introduction to Removable Wallpaper
Removable wallpaper, also known as temporary wallpaper, is a versatile and convenient option for those looking to add some flair to their living space without committing to a permanent design. This type of kitchen wallpaper is typically made from a high-quality vinyl material that is both durable and easy to apply. Unlike traditional wallpaper, which often requires messy and time-consuming installation techniques, removable wallpaper is designed to be quickly and easily installed, with no need for messy glue or complicated tools.
One of the primary benefits of removable wallpaper is its versatility. Whether you’re looking to create a bold accent wall or simply add some texture or pattern to a room, there are endless options available to suit your style and preferences. From classic floral designs to modern geometric prints, removable wallpaper can help you achieve virtually any look you desire.
In addition to its ease of installation and versatility, removable wallpaper is also a great choice for renters or anyone who likes to switch up their decor frequently. Because it can be easily removed without damaging the underlying surface, it’s a convenient and low-risk way to experiment with different design ideas and color schemes.
Overall, wallpaper for walls is a stylish and practical choice for anyone looking to add some personality to their living space without the commitment of traditional wallpaper. With its easy installation, endless design options, and convenient removability, it’s no wonder why this type of wallpaper has become increasingly popular in recent years.
Tools and Materials Required for Installing Removable Wallpaper
Installing removable wallpaper can be a fun and easy DIY project that can transform the look of a room without the commitment of traditional wallpaper. Here are some of the tools and materials you will need to get started:
Tools:
- Measuring tape: to accurately measure the dimensions of the wall or surface you will be covering.
- Level: ensure that the wallpaper is straight and level when applied.
- Razor blade or craft knife: trim the wallpaper to fit around edges and corners.
- Squeegee or smoothing tool: to remove air bubbles and smooth out the wallpaper as it is applied.
- Scissors: to cut the wallpaper to size.
- Pencil or marker: to mark measurements and cut lines.
- Step stool or ladder: if you need to reach high places.
Materials:
- Removable wallpaper: choose a design and color that complements your decor and personal style.
- Primer: if the wall or surface is not already primed, you may need to apply a primer to ensure that the wallpaper adheres properly.
- Water and sponge or cloth: clean the wall or surface before applying the wallpaper.
- Wallpaper paste: some removable wallpapers may require a paste or adhesive for proper adhesion.
- Paint roller or brush: if using wallpaper paste, you will need a tool to apply it to the back of the wallpaper.
- Wallpaper smoother: some removable wallpapers may require a smoother to ensure proper adhesion.
Before you begin, be sure to read the manufacturer’s instructions for the specific wallpaper you have chosen, as some may have additional requirements or recommendations. With the right tools and materials, installing removable wallpaper can be a fun and rewarding DIY project that can give your room a fresh new look.
Preparing Your Walls for Removable Wallpaper
Removable wallpaper is a fantastic option for those who want to add some personality and color to their walls without committing to a permanent design. However, before you can start hanging your new wallpaper, you need to properly prepare your walls to ensure a smooth and flawless finish. The first step is to make sure your walls are clean and smooth.
Remove any dirt, dust, or debris using a soft cloth or a vacuum cleaner. If your walls have any bumps, cracks, or holes, you should fill them with spackle or joint compound and sand them down until they’re smooth. This will ensure that your wallpaper adheres evenly and doesn’t show any imperfections. Next, make sure that your walls are completely dry. If there’s any moisture on the walls, it can cause the wallpaper to peel or bubble. You can use a dehumidifier to help speed up the drying process.
Finally, prime your walls with a high-quality primer. This will help the wallpaper adhere better and make it easier to remove when you’re ready for a change. By following these steps, you’ll be able to create a beautiful and long-lasting wallpaper design that can easily be removed and replaced whenever you want.
Measuring and Cutting the Removable Wallpaper
Measuring and cutting removable wallpaper can be a simple and easy process with the right tools and techniques. Here are some steps to follow:
- Measure the area: Before starting to cut the wallpaper, it’s essential to measure the area you want to cover accurately. Use a tape measure and note down the width and height of the wall.
- Add extra length: It’s a good idea to add a few inches to the height and width measurements to ensure that you have enough wallpaper to work with. This extra length also allows for some margin of error while cutting.
- Mark the wallpaper: Once you have the measurements, mark the wallpaper using a pencil or a marker. Make sure to mark the back of the wallpaper, so the marks don’t show on the front.
- Use a straight edge: To cut the wallpaper in straight lines, use a straight edge such as a ruler or a yardstick. Hold the straight edge against the marked line and use a utility knife or a pair of scissors to cut along the edge.
- Cut in manageable strips: If you are covering a large area, it’s best to cut the wallpaper into manageable strips. This makes it easier to handle and reduces the risk of tearing or damaging the wallpaper.
- Double-check the measurements: Before you start sticking the wallpaper to the wall, double-check the measurements to ensure that the strips are the correct length and width.
- Trim the excess: After sticking the wallpaper to the wall, trim any excess with a sharp knife or a pair of scissors. Make sure to be careful not to cut into the wall or leave any jagged edges.
By following these steps, you can measure and cut removable wallpaper with ease and accuracy, making the installation process a breeze.
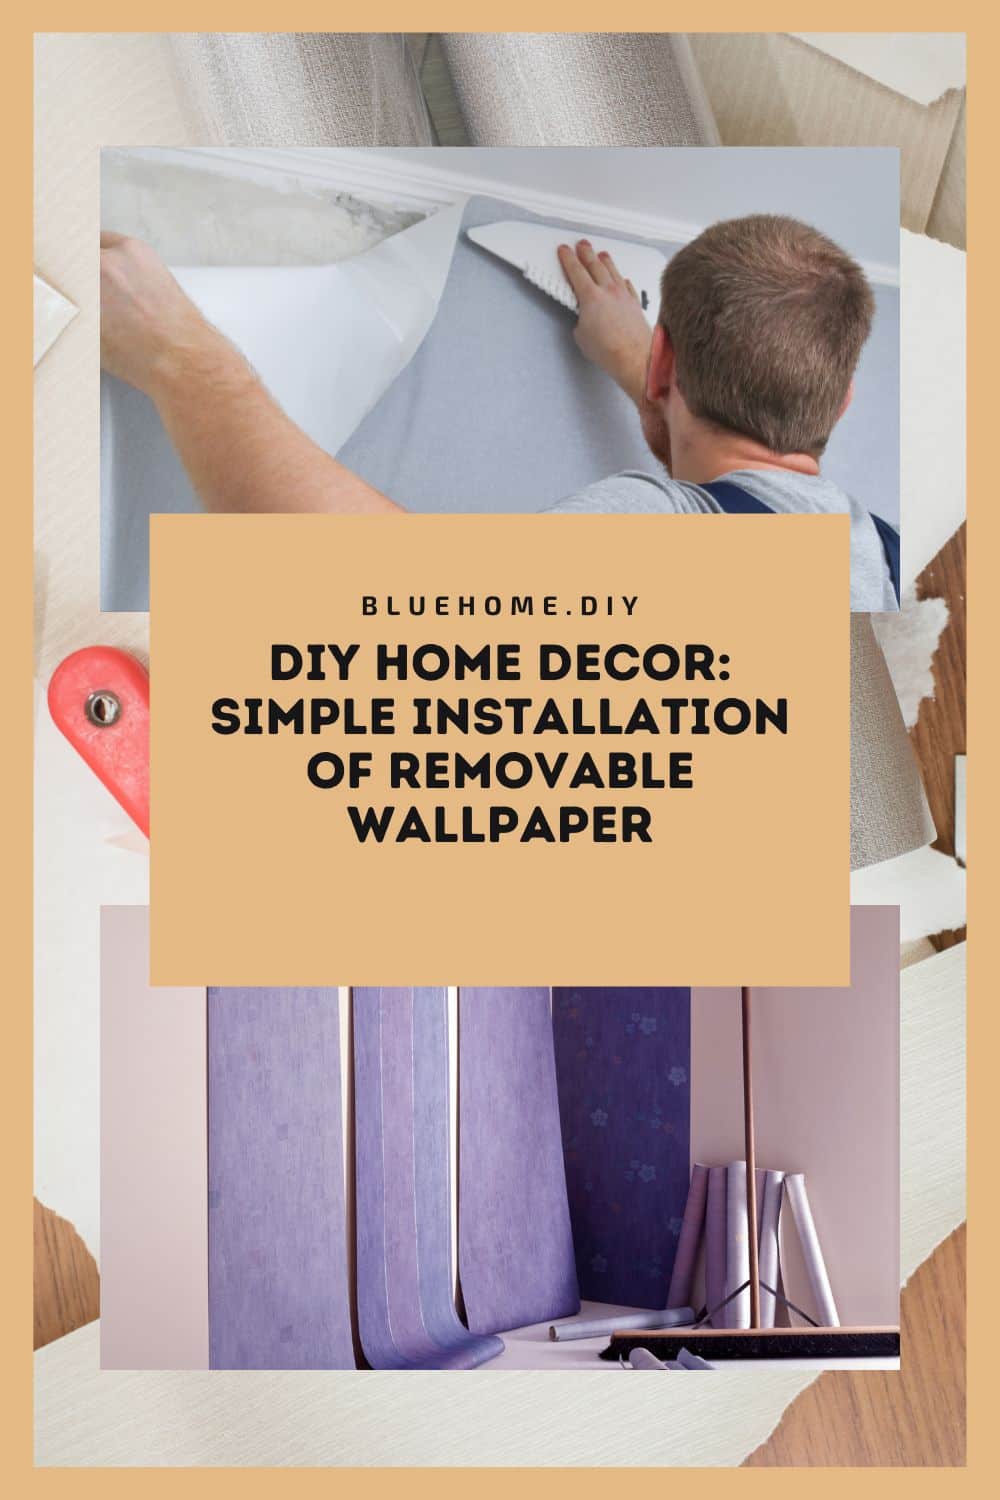
Applying the Removable Wallpaper
Applying removable wallpaper is a simple and easy way to transform the look of a room without committing to a permanent change. The first step is to measure the wall or area where you plan to install the wallpaper. Make sure to measure accurately, and add a few extra inches to the height and width to account for any uneven edges or corners. Next, prepare the surface by cleaning it thoroughly with a damp cloth to remove any dust or debris. Allow the surface to dry completely before proceeding.
When you are ready to install the wallpaper, start by peeling off a small section of the backing paper to expose the adhesive. Carefully align the top edge of the wallpaper with the top of the wall, ensuring that it is straight and level. Slowly peel away the backing paper while smoothing the wallpaper onto the wall with a squeegee or your hands. Be sure to work out any bubbles or wrinkles as you go.
Continue to apply the wallpaper in strips, working from top to bottom and overlapping the edges slightly to ensure a seamless look. If you need to make any cuts or adjustments, use a sharp knife or scissors to trim the wallpaper to fit around corners, windows, or other obstacles.
Once you have applied all of the wallpaper, take a step back and check for any bubbles or wrinkles that you may have missed. Gently smooth out any imperfections with your hands or a squeegee. If you need to remove or reposition any sections of the wallpaper, simply peel it off the wall and reapply it as needed.
Overall, applying removable wallpaper is a quick and easy DIY project that can instantly transform the look of any room. With just a few basic tools and some patience, you can create a beautiful and unique accent wall or add a pop of color and pattern to any space.